Imagine stepping outside into your very own outdoor kitchen – designed exactly how you want it. Whether you’re cooking for family, entertaining friends, or simply enjoying time spent outside, a custom grill island is an exceptional centerpiece for your backyard. Get the process started today so it can be ready for installation come spring or summer.
At Fireplace Stone & Patio, our team can walk you through the process of designing a custom grill island that aligns with your personal needs and aesthetic.
Before you dive into the design process, we recommend going through our guide, as seen below, to help you decide what you need to incorporate into your outdoor living space.
Step 1: Determine how you’ll use your grill island.
The first step in designing your custom outdoor island is to think about how exactly you plan to use it. Will this space be for quiet family dinners or big outdoor gatherings? Do you envision hosting parties and cookouts, or simply relaxing outdoors? The way you intend to use your outdoor kitchen island will influence both its design and functionality.
Consider the following questions…
- Do you typically just cook for yourself or for large groups?
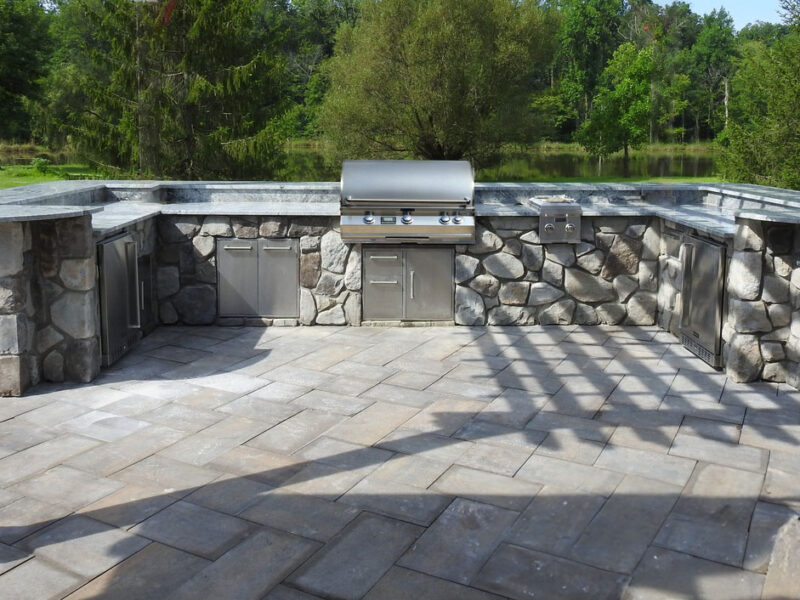
- Will your island be used primarily for grilling or do you need to add additional features such as a sink, fridge and waste bin?
- What kind of social or cooking experience do you want to create in your outdoor space?
Answering these questions will help you determine the size of your island, the components you’ll need and the amount of space it should take up in your outdoor area. Don’t forget to measure your patio space as well, as it will guide your decision-making process for both size and layout.
Step 2: Explore outdoor island examples.
Once you’ve determined how you’ll use your grill island, the next step is to explore your options. We offer a variety of shapes and sizes, which may include a straight, L-shaped or horseshoe shaped island. A larger backyard may accommodate a more expansive island, while smaller spaces could benefit from more compact, simplified designs.
Additionally, now that you have an idea in mind for how you’ll use your island and the general design, it’s time to consider built-in components. We recommend considering features that will be the most useful for your outdoor kitchen.
Will you need storage for utensils and condiments to avoid running in and out of the house every time you need something? A built-in fridge or trashcan can also make the simple tasks of grabbing a drink or tossing garbage convenient.
Step 3: Choose your finishing touches.
Now that your island aligns with your vision in terms of functionality, it’s time to add the finishing touches. Our custom grill islands come in a range of materials and finishes, including stone and stucco options. Whether you want a sleek, modern look or something more rustic, we have the right finishes to complement your outdoor style.
Step 4: Finalize your custom island order.
Once you’ve explored your options with our sales team and have made all of your selections, it’s time to place your order! Our team will handle everything from ordering to delivery and installation, ensuring your new outdoor kitchen is set up and ready for use.
If you’ve been envisioning upgrading your outdoor oasis, now is the time to start the planning process so it can be ready to install once the weather warms up! Stop by our showroom to get started. You can also learn about our modular islands here.
Tags: Grill islands Omaha, grill islands Lincoln, grill islands Kearney, grill islands Grand Island, grill islands Waukee, grill islands Des Moines, outdoor islands, outdoor grill islands, outdoor kitchen islands, custom outdoor islands, outdoor living, outdoor cooking, commercial outdoor cooking, residential outdoor cooking, patio design, exterus grill islands.


